Dumping Nintendo 3DS System Files: Difference between revisions
No edit summary |
boot9strap 1.4 |
||
| Line 2: | Line 2: | ||
[[File:GM9 Copy boot9 and otp.png|thumb|Copying movable.sed in GodMode9]] | [[File:GM9 Copy boot9 and otp.png|thumb|Copying movable.sed in GodMode9]] | ||
ARM9 BootROM contains various encryption keys. OTP is used for encryption of console-unique data, such as NAND partitions. | ARM9 BootROM contains various encryption keys. OTP is used for encryption of console-unique data, such as NAND partitions. | ||
=== Using fastboot3DS === | === Using fastboot3DS === | ||
| Line 26: | Line 20: | ||
#Turn off the system. | #Turn off the system. | ||
#Check inside {{code|/gm9/out}} on the SD card. The files {{code|boot9.bin}} and {{code|otp.bin}} should be created. | #Check inside {{code|/gm9/out}} on the SD card. The files {{code|boot9.bin}} and {{code|otp.bin}} should be created. | ||
=== Using boot9strap before 1.4 === | |||
This is the default setup when using [https://3ds.hacks.guide/ 3DS Hacks Guide]. This does not work when using boot9strap through ntrboot. If ntrboot is used, use the GodMode9 section above. | |||
'''This option no longer works for boot9strap 1.4.''' | |||
#While holding START + SELECT + X, press POWER. | |||
#Check for {{code|/boot9strap}} on the SD card. The files {{code|boot9.bin}} and {{code|otp.bin}} should be created inside. | |||
== movable.sed == | == movable.sed == | ||
Revision as of 04:31, 29 May 2022
ARM9 BootROM & OTP

ARM9 BootROM contains various encryption keys. OTP is used for encryption of console-unique data, such as NAND partitions.
Using fastboot3DS
This requires fastboot3DS v1.1 or newer installed to FIRM.
- While holding HOME, press POWER to boot into the fastboot3DS menu.
- Choose "Miscellaneous..." -> "Dump bootroms & OTP".
- Check that all steps show "success", then press B to power off.
- Check inside
/3dson the SD card. The filesboot9.binandotp.binshould be created.
Using GodMode9
This requires GodMode9 v1.1.8 or newer, started through boot9strap.
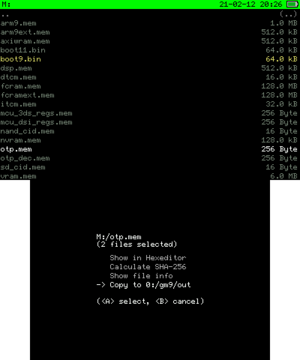
- Start GodMode9.
- Navigate to
[M:] MEMORY VIRTUAL. - Press L on
boot9.binandotp.memto select both. - Press A to select, then choose "Copy to 0:/gm9/out".
- Turn off the system.
- Check inside
/gm9/outon the SD card. The filesboot9.binandotp.binshould be created.
Using boot9strap before 1.4
This is the default setup when using 3DS Hacks Guide. This does not work when using boot9strap through ntrboot. If ntrboot is used, use the GodMode9 section above.
This option no longer works for boot9strap 1.4.
- While holding START + SELECT + X, press POWER.
- Check for
/boot9strapon the SD card. The filesboot9.binandotp.binshould be created inside.
movable.sed

movable.sed contains KeyY for SD data encryption for all files under /Nintendo 3DS/<id0>/<id1>. The file is located in CTRNAND at /private/movable.sed.
If there is an essentials backup (essential.exefs) created by GodMode9, the file is available inside as "movable".
Using GodMode9
The drive depends on the source. SysNAND is at [1:] SYSNAND CTRNAND and is most likely the one you want. EmuNAND/RedNAND is at [4:] EMUNAND CTRNAND. A mounted NAND backup is at [7:] IMGNAND CTRNAND.
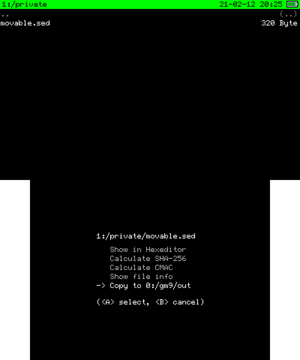
- Start GodMode9.
- Navigate to the source drive ->
private. - Select movable.sed, then choose "Copy to 0:/gm9/out".
- Turn off the system.
- Check inside
/gm9/outon the SD card. The filemovable.sedshould be created.